Providing Professional, Unbiased, Quality Reviews of the Products You use Everyday
Discover Informative Articles of Reviews relating to Home and Garden, Family, and Consumer Shopping

Join KevsProReviewson

How to Measure Your Carpeting Costs before Choosing the Right Carpet

In this article we will talk about how you can do the work yourself and save big money.

Home Remedies - How To Remove Stains from Your Carpet

Maybe we can pick up a tid bit or 2 that will help us out as well. So without further growling let's get on with it and see what they are.

Miter Saw Reviews: Read My Review of the DeWalt 713 Compound Miter Saw

Enter now my review for the master craftsman carpenter in your home. My review of the Compound Miter Saw.

See Practical Ways to Furniture Upholstery Cleaning and Upholstery Fabrics

In this article I want to give you some practical ways to keeping your upholstery clean.

Discover Variations of Outdoor Carpeting on Your Deck or Patio

In this article we'll take a look at the different variations of outdoor carpeting that is available to you. This will be a benefit to you, if you are thinking of covering your:

Thursday, November 24, 2011

Are You Breathing Dangerous Chemicals without Knowledge

many scented air fresheners
Theres nothing like going to Mom's house after she gets done cleaning it and smelling the wonderful air freshener that she just sprayed. Mmmmmm....man does it smell wonderful! Seems like she could always pick the best. My favorite is strawberry and vanilla. Also like the cinnamon one as well.

Nothing beats the good smelling air fresheners that are on the market today. Heck, they even have the kind you can just plug in to the electric outlet and it will keep your house smelling good for many days at a time. As well as theres many different kinds and types of air fresheners. Some of those types are:
  • Candles Scents
  • Potpourri
  • Warm Oil Scents
  • Powdered Wax Scents (ever heard of those?) Long lasting good stuff..
Also we know about the fresh scents that come in our household cleaning chemicals. The scents available today in every form of cleaning chemicals to air freshener scents is astronomical. But, what I want to direct your eyes at in this article, is the possibility that those chemicals may not be healthy just because they smell good.


In this article we will take a look at these chemicals that we're breathing when they're mixed with the air and other materials. I believe that knowledge is power. The more knowledge you have consequently the more safer you can be about anything. That is the benefit for you in this article.

lady using cleaning chemicals
Enjoy the products, but with maximum safety. Now thats a good smelling combination. So what about air fresheners is there anything to be aware of with them?

Absorb The Research Knowledge

Well, I did some research and study on this very subject and heres what I came up with for us.

Several years ago the California Air Resources Board (ARB) had a study done on the volatile organic compounds from consumer products used in the home and most institutions. The team commissioned for this study did a 330 page report called "Indoor Air Chemistry: Cleaning Agents, Ozone and Toxic Air Contaminants.

This research team focused their work on two areas:
  • The investigation of toxic air pollutants in household cleaning products and air fresheners, especially a class of chemicals known as ethylene-based glycol ethers.
  • And an examination of the chemistry that occurs when those products are used indoors in particular, products that contain a reactive group of chemicals called terpenes.
The research team determined which household products contain terpenes and glycol ethers, and the quantities of these compounds. They compiled a list of household cleaners and air fresheners from five retail chain outlets in California. Then examined the labels and advertising claims (e.g. pine scented, etc) for these products and reviewed available product data sheets.

From this data they selected four air fresheners and 17 cleaning products, including one each of disinfectants, general purpose degreasers, general purpose cleaners, wood cleaners, spot removers, furniture cleaning products, and multi-purpose solvents.

lady spraying air freshener
Upon the researchers testing of the terpene-containing products in the presence of ozone, it found that reactions produced very small particles with properties like those found in smog and haze. As well as other oxidation products, formaldehyde, a respiratory irritant that is a classified Group 1 carcinogen. The amounts of terpenes that were converted into pollutants was dependent on the amount of ozone that was present.

The researchers ran a series of 18 experiments to determine the level of exposure people might be subject to when using the products in a confined space. So the tests were conducted in a 230-square foot room with ventilation at an ordinary level which gave an approximate change of one air change every 2 hours.

In some of the tests of terpene-containing products, ozone was introduced into the room similar to those that would occur in households and offices. Some of the tests were run using full-strength solutions and others with diluted solutions.


The tests produced various results, some reassuring, and some raising concerns. They found that the good news is that when people used the products under normal or ordinary circumstances, their exposure to ethylene-based glycols, formaldehyde and fine particles did not reach dangerous levels.

That is, levels set by regulatory agencies as the maximum exposure levels believed to be safe. But, on the other hand, researchers pointed out, that because formaldehyde is also released from other sources such as plywood and pressed treated wood products that are found in most buildings, any increase in formaldehyde emissions is not good.

They said that in several realistic use scenarios, the tests showed that people could be exposed to potentially dangerous levels of toxic pollutants. Those scenarios included:
  • Cleaning in a small, moderately ventilated bathroom.
  • Air freshener and ozone in a child's bedroom. This scenario could occur when people use both air fresheners and ozone-generating devices simultaneously in a room.
  • Cleaning when outdoor ozone levels are high.
  • Multi-house cleaning by a professional home cleaner.
                                                                                    The Summation

the natural air freshener
They surmised that the message from these tests is that everyone, especially cleaning professionals should be cautious about overuse of products with high levels of ethylene-based glycol ethers and terpenes. Your rooms should be well ventilated during and after cleaning. Some products should be used in diluted solutions instead of full strength.

And cleaning supplies should be promptly removed from occupied spaces once the cleaning is done.

The Final Wrap Up

I don't believe these tests to be exhaustive or conclusive myself. I think more research needs to be done on these products. The reason being that everytime you turn around another company is introducing a new kind of air freshener or cleaning product with different chemicals doing different things.

This to keep competition strong between all the companies that create these smell good products. The old "well you should use mine because it's better then your's type of competition" - all for a buck, you know. Because of that, it creates more chemicals that make more and different reactions. These need to be constantly looked at for consumer safety.

This of course is just my opinion. What do you think? I think the benefit to us here is the knowledge we've gained and the advice of not using our favorite air fresheners and cleaning products in strong concentrations with out adequate ventilation. This is good common sense advice.

One other thing, never use air freshener sprays or cleaning solvents around fire or flame. Ethylene-glycol chemicals are alcohol based and highly flammable. Be safe please!

Enjoy your favorite air fresheners in safe moderation..

Thanks for coming by...


Saturday, November 19, 2011

Approved Fireplace Safety Increase Your Fireplace Awareness

burning firewood fireplace safety
As cold weather sets in again the fireplace begins to look better and better. A fireplace in your home adds a nice amenity to the surrounding of the home. It creates romance, warmth, and long lasting enjoyable memories for those that have them.

Many homes have 2 or 3 fireplaces in different rooms of the house. People love the ambiance of a nice cozy fireplace. But theres a great responsibility that comes with owning a fireplace as well. One of those responsibilities are the maintaining of it in a safe operating manner.

It seems that at least once a year, I always hear of somebody who's house caught fire and burned down because of the fireplace. Fireplace safety is one of those things that many people over look. They think that all you have to do is put in the wood and fire it up and enjoy.

Nothing could be further from the truth. Thats the benefit of this article to you. To help remind you of the importance of safety where your fireplace is concerned. I want to talk to you about the important fireplace safety things that you should do at least every year.


Some might say "well I don't use my fireplace very much at all"! The point is, whether or not you use it much in the winter months, these things should at the least be checked if not performed every year. Your investment in your house depends on it. Not to mention the safety of your family.

young woman enjoying fireplace
In this article I will focus primarily on the wood burning fireplace. There are 3 types of fireplaces.
  • Wood burning
  • Gas
  • Electric
The electric fireplace we will not talk about because they are nothing more than a heater with a fake fire presence. They don't require the attention that the other 2 do. Everything that I mention here needs to be done as well for the gas fireplace.

So with that foundation laid for you, let's get on with the things that should be looked at and performed if necessary. I'll save the most important one for last.
  • Chimney Cover:
Most houses with a fireplace also have a chimney cover at the top and outside of the chimney. Some have screened covers, some screened in metal covers, and some with open metal covers over them. This is to keep leaves and dirt and twigs from trees from getting down inside the chimney.

These need to be checked every year for wear. If rusted and worn from weather, replace it. Always check down the chimney while up on the roof of your house, for tree twigs and anything else that could block the flow up the chimney.
  • Remove Burned Ashes After Every Use :
modern clean safe fireplace
Always remove the burned ashes from the fireplace, especially if you've used it quite a few hours at one time. This will help your fire burn much cleaner and reduce smoke from coming out into the house. As well as keep any hot ambers from possibly getting out onto your floor or carpeting.
  • Make Sure Your Fireplace Grating Is Covering the Front:
The fireplace grating is what protects from the hot ambers getting out or should I say "popping" out of the fire onto the floor and possibly causing a fire. This should be cleaned not because of the ambers but because soot from the fire builds up on these after time and blocks your view of the fire.

Also check it for wear and thats its no bent up from age and general living. Replace if necessary.
  • Last But Not Least, the Most Important Of All: Check Your Chimney Flue for Wear and Cleanliness!
Always, let me say this again, ALWAYS make sure before, you start a fire in your fireplace that the flue is open! The flue is a metal valve if you will, that keeps anything from coming down from above that might get past your chimney cover and getting into the house.


This flue has different settings for how much you want it to be open. The reason for this is to allow you to keep as much heat in side the house as possible as well as letting the smoke and soot up the chimney. Sort of a way to adjust the temperature in the house from the fire. If this is not checked to be open before every fire you start heres what can happen if it's closed...
  • Smoke from the fire builds up and fills the house with smoke and soot.
  • With the fire burning now there becomes no way to reach in and open the flue.
  • The only way to put out the fire is by extinguisher or water.
  • You now have a huge dangerous mess on your hands assuming you get water or fire extinguisher to it in time before your house burns down.
happy family fireplace
Also you want to make sure the flue valve is clean from soot build up over all the fires you've had that you didn't clean it. Which could add up to years. You should have your chimney cleaned by a professional or if you're good at it, at least every 2 years. Surely though you can see the importance of making sure your flue is open before starting a fire.

The Conclusion

If you follow these steps to make sure you have a safe fireplace, theres no way you shouldn't have many wonderful years of use out of it. And never have to worry about the danger that lurks where fire is concerned. None of these should be overlooked. Especially the Flue.

I hope you have a safe, warm and happy winter with your fireplace.

Thanks for coming by...


Monday, November 14, 2011

How to Remove the Unseen Predator Radon Poisoning and Radon Facts

radon level survey
We as humans may not pay attention to the air we breath very closely. Hopefully my other article will help you to increase your attention to that, so you can increase the quality of the air that your breathing. Paying attention to this is important, but theres another lurking monster that we need to know about. Radon!

Radon is an element that seeps into our dwelling place unknowingly. Sometimes when its realized it is to late to do anything about it. At least for the person infected by it. This element is very deadly and is a silent predator. I will expose this predator to you in this article.

Get The Radon Facts

Here are what I'll touch on to help you become more aware:
  • What is Radon
  • Radon levels
  • Radon Poisoning
  • Radon Testing
  • How to Remove Radon
Radon in homes was discovered to be a major cause of cancer in those affected by it. The Surgeon General has determined that radon in homes to be the second leading cause of lung cancer in the U.S today. I think this is worth paying attention to, don't you? Let's take a look at what radon is.
  • What is Radon:
Radon is a cancer-causing radioactive gas. You cannot see, smell or taste radon. If you're a smoker and you have this gas in your home at a high level, you're at a higher risk of radon poisoning. Your risk for lung cancer goes way up at this point.


Radon is a naturally occurring gas that comes from the breakdown of Uranium in the earth. Also well water has been thought to be a source of radon gas.

Radon was first discovered by English physicist Ernest Rutherford in 1899. This discovery is also credited to German physicist Friedrich Ernst Dorn in 1900. Ernest Rutherford found radon's alpha radiation, and Friedrich Dorn discovered that radon was releasing a gas from the ground.
  • Radon Levels:
The primary infection from radon gas comes in the air that you breath in your home. Radon seeps through up from the ground into our living space. As mentioned before this gas is believed to be concentrated in ground water as well.

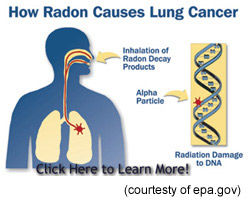
how radon causes lung cancer
If you have a sump pump in your basement or crawl space you'll want to pay special attention to this. As the sump pump hole leads directly to the earth under your foundation. We will talk about remedies for this later on.

Now, of course the levels of radon gas will be higher in confined air spaces such as in mines and buildings. Radon levels can be extremely higher in places like tunnels, power stations, caves, public baths, and spas as well. The concentration in homes are generally lower than these places.

But in my opinion any level of radiation gas is important to pay attention to.
  • Radon Poisoning
A family whose home has radon levels of 4 pCi/l is exposed to approximately 35 times as much radiation as the Nuclear Regulatory Commission would allow if that family was standing next to the fence of a radioactive waste site. (25 mrem limit, 800 mrem exposure)

There is no acceptable level of radiation in your home. Any radioactivity of any level should be eliminated as soon as possible. Radon gas is a known carcinogen (cancer causing) agent. A deadly predator at any level.
  • Radon Testing:
Testing your home is the only way you'll ever know how high, if at all, the levels are in your dwelling. Since there are no immediate symptoms of exposure to it, radon exposure takes place over many years. Fortunately testing for radon is fairly inexpensive and can be done by most anyone.

Simply purchase a testing kit for that purpose. At the end of the article I'll give you a couple links to a test kit where you can get one.
  • How to Remove Radon:
There are 2 primary ways to remove radon from your dwelling. And they're easy to implement. Those are:
  1. Seal all cracks in your foundation.
  2. Increase ventilation of outside air into your home.
As to number 2 here you can also think about adding an exhaust fan into one of your basement windows. This will help to remove the gas and keep the air flowing in your basement. Basically what you want to accomplish is the mixing of the outside air with the inside.


radon free familyBy keeping the air moving and replenishing it with outdoor air will significantly bring down the radon levels in your home. This is assuming you have ran the test and you show a high concentration of it in your home. Of course if your level tests 0, then you're good as gold!

The Conclusion

Let's face it folks, any level of any poisonous gas in your home needs to be looked at in serious terms. Especially one you can't see, taste or smell. Like carbon monoxide in a sense, can kill you albeit much quicker, radon poisoning is no predator to play with.

My hope in this article is to light a little fire under your rear end, and get you to test for this gas, for the safety of you and your family. Life is too precious and you only have one go around at it, to have it sucked out of you unknowingly by an unseen predator called radon.
radon test kit

Please get your home tested today! Here are the links to get your test kit that I spoke of up above:

Thanks for coming by...


Wednesday, November 9, 2011

Effective Winterizing and Energy Efficient Tips and Ideas to Save You Money

winterization of yourself as well
With the winter coming on again its getting time to winterize our homes so they can be as energy efficient as possible. Don't let the short little Indian summers your having fool you. That's God telling you that you have a little more time left to get ready for the winter.

Yes, you should take advantage of it to make good on making your home as tightened up as possible. Everybody knows the high cost of gas and electricity to heat the home. Even more so those of you that have those 3000 and up square foot homes.

More space to heat means more cost to do it. There are many things you can do when figuring out how to winterize a home. Winterization options are aplenty. And in this article I'll give you some tips and ideas to accomplish that very thing.

There are lots of ways to winterize both on the inside and outside of the home. Most ways are not expensive to do. All it takes is a little bit of time and elbow grease to git-r-done. But the outcome in saving's wise is tremendous for you.

The Money Saving Tips

So what are some winterizing steps that we can take to save a boat load of money? Here are the ways:
  • Caulk around the windows inside and outside
You can get tubes of caulk at your favorite hardware store for about 5 to 7 bucks depending on the type you use. A quarter inch bead of caulk around the windows, smoothed out by your finger or a caulking tool to make sure you get all the cracks and crevices.

Also doing the same thing on the inside will make sure your windows are good and winterized for the winter. Saving from the heat escaping around the edges of those windows. Thats a big one! Especially if you have a lot of windows facing the west.


Because thats where most of the wind and weather come from. If you don't have any windows facing the west you're in better shape than most.
  • Add winterizing plastic sheets to the outside of your windows
These are clear plastic sheets that you install on the outside (can be used on the inside as well) of your windows to aid in keeping the heat inside and cold air out. The best tape to use for this is the good ole "hundred mile an hour tape" commonly known as duct tape.

Why use this tape? It is the most durable and strongest of the different tapes out there. Heck I even hold my truck together with it. It's good stuff. Adding this to the above tip is for superior winterization for your home. Can't go wrong with doing both of these tips.
  • Run caulk on the outside around the base of your home
winterizing is no joke
Another great tip here for you, is to run about a half inch bead of caulk to the base of your house where the house meets the foundation. It doesn't matter whether yo have a basement or not, in fact those of you that have basements should pay closer attention to this one. As well as those of you that have those crawl spaces.

Doing the caulking here will ensure that no cold air gets into your basement or comes into your house around the floors. You know how you walk around in your socks and bare feet in the winter and you can feel the cold on the floors? Especially if you have hardwood flooring. This will help put an end to that.
  • Install weather stripping around your doors
Let's see, we covered the windows and the base of the house. Oh yeah, we don't want to forget those doors. The doors are a big concern for the drafts and air that comes in around them. At your favorite hardware store you can get many different sizes and styles of weather stripping.

This is easily installed because most of them have one side that is sticky. Simply install the stripping around the frame of your doors and you have winterization with energy saving super proportions here. I don't think I've ever been in a home where the doors weren't giving up to a draft of air without it. Doing this alone will save you moocho amounts of money through the winter.
  • Add extra insulation to your attic
Every home has some amount of insulation in the attic. It was built with it installed. We all know that heat rises. The better the insulation in the attic the better the holding of heat in the house. There are several different types of insulation you can get. Just depends on how much your willing to spend.

Probably the most cost effective is the standard fiberglass type. And the easiest to install. I prefer the foam method of insulation. This is sprayed in as a wet almost liquid then as it hardens it expands filling all the gaps and crevices. This is the most superior winterization in my opinion. But more expensive to.


Nevertheless, the point is the more insulation you have up there in the attic will hold more heat in, thereby saving you more money.
  • Add extra insulation to your walls
With this method of winterizing you should use the spray in type as mentioned. The reason is because you'd have to tear out your drywall to install more. Thats way to much expense. Unless you have the money to spend for it of course.

winterization of your atticWith the spray in type they just drill small holes in your drywall to allow for spraying it in. Filling holes with spackling is way more easier than replacing drywall. You might have to have some touch up paint of your color to complete the look of it. This is very cost effective, energy efficient winterization just like the above tip.

Do you see what we're doing here? We're tightening up the home so as to hold as much heat or energy in which will result in great money savings for you. Thats the idea. Temperatures from 20 degrees and on down are no joke. Especially when it come to your money today.
  • Add more cloth based furniture and draperies to your home in the winter
Now some of you might think this is a strange or weird tip to say here. Well just hang with me and I'll prove my point with this tip. For example, have you ever gotten into a car in the winter, and theres leather seats and leather upholstery all over the inside of it? It makes it colder doesn't it! Until your butt warms it up or the heater does.

Now on the other hand, have you gotten into a car that has some type of cloth material for the upholstery? Much better feeling right! Doesn't take long for your body to warm those types of seats up. The same applies to your house. Don't get me wrong I think leather furniture is cool, but it is just much colder then traditional cloth materials.

winterizing your windows
The reason being that cloth based holds the heat better than leather or vinyl. It works the same with windows as well. Windows with just louvers or just those metal or plastic blinds will be colder than cloth based draperies. Cloth based draperies will hold out more cold air and keep the heat and energy in the house. Which results in energy efficient winterizing savings for you the homeowner.

The Conclusion

In this article I've given some basic techniques and tips to save you lots of money on the cost of living in the winter. When it comes to how to winterize a home, you can't go wrong with these tips and ideas. Some might ask "do I have to do this every winter"? I wouldn't think so, but keep an eye on those areas we've talked about and touch up where necessary.

Especially the caulking areas. Because of the heating up and cooling down of the temperatures throughout the year, can cause the caulking to degrade. You want to keep an eye on this for each winter season. There are other things you can do, just use your imagination.

It is my hope that these cost effective tips will help you to save much money on your heating bills this and every winter season.

Thanks for coming by...