Providing Professional, Unbiased, Quality Reviews of the Products You use Everyday
Discover Informative Articles of Reviews relating to Home and Garden, Family, and Consumer Shopping

Join KevsProReviewson

How to Measure Your Carpeting Costs before Choosing the Right Carpet

In this article we will talk about how you can do the work yourself and save big money.

Home Remedies - How To Remove Stains from Your Carpet

Maybe we can pick up a tid bit or 2 that will help us out as well. So without further growling let's get on with it and see what they are.

Miter Saw Reviews: Read My Review of the DeWalt 713 Compound Miter Saw

Enter now my review for the master craftsman carpenter in your home. My review of the Compound Miter Saw.

See Practical Ways to Furniture Upholstery Cleaning and Upholstery Fabrics

In this article I want to give you some practical ways to keeping your upholstery clean.

Discover Variations of Outdoor Carpeting on Your Deck or Patio

In this article we'll take a look at the different variations of outdoor carpeting that is available to you. This will be a benefit to you, if you are thinking of covering your:

Wednesday, March 30, 2011

Gas Grilling? 10 Do's and Don't's of Propane Gas Tanks Safety

burning propane grill
Grilling season is here. And there are many people who use Propane Gas Grills to barbecue or cook their food with. Gas grills are usually the preferred grill to use if you are having a large party or gathering.

Some people prefer them to because of the many different apparatuses and uses that come with them. You can get as elaborate as you want with a gas grill. The reason being that they will generally cook at a much faster rate than a regular charcoal grill.

One reason is the instantaneous high temperature after ignition. That is precisely the reason for this article. Gas grills present a whole different ballgame to grilling because of the use of propane tanks. Let me start by giving you a bit of understanding on propane.


Propane is a hydrocarbon (C3H8) and is sometimes referred to as liquefied petroleum gas, LP-gas, or LPG. Propane is produced from both natural gas processing and crude oil refining, in roughly equal amounts from each source. Most propane used in the United States is produced domestically, with about 15 percent imported from overseas.

It is nontoxic, colorless, and virtually odorless. As with natural gas, an identifying odor is added so the gas can be readily detected. Propane is used every day by millions of Americans and people around the world.

There are many uses for propane besides grilling. Here are some of those:
     
  • For Furnaces
  • Water Heaters
  • Air Conditioners
  • Fireplaces
    propane tank safety
  • And Appliances 

There are also uses in agriculture and other commercial endeavors. However we will be dealing with your backyard gas grill.  There are 10 do's and don't's to propane safety that I want to give you so that your grilling experience is a fun and safe one this season.

I don't believe these are all inclusive. You should always use common sense when dealing with dangerous gases.

Where propane tanks are concerned here are 10 Do's when handling and using it:


  1. Follow the grill manufacturer’s instructions and keep written materials handy.
  2.  
  3. If the igniter no longer works, replace it in accordance with the grill manufacturer’s instructions.
  4.  
  5. Keep the top of the grill open until you are sure the grill is lit, even if you have an electronic ignition.
  6.  
  7. Cover disconnected hose-end fittings with plastic bags or protective caps to keep them clean when the grill is not in use.
  8.  
  9. Store propane cylinders outdoors in an upright (vertical) position.
  10.  
  11. If you smell gas, and it is safe to do so, turn off the cylinder valve, turning it to the right (clockwise). If you are unable to turn off the valve, immediately leave the area and dial 911 or call your local fire department. Before you use the grill again, have a qualified service technician inspect your grill and cylinder.
  12.  
  13. Consult a qualified service technician if you are having grill or propane cylinder problems.
  14.  
  15. Keep your grill clean to prevent flare-ups.
  16.  
  17. Check for knots or kinks in gas hoses.
  18.  
  19. Make sure the area around the grill is free of leaves or anything else that could ignite.

Those are the proper ways to handle propane tanks where your grill is concerned. Can you think of more?

And the 10 things not to do where propane tanks are concerned:

  1. Smoke cigarettes or anything while handling a propane cylinder.
  2.  
  3. Use matches or lighters to check for propane leaks.
  4.  
  5. Pour an accelerant such as lighter fluid or gasoline on the grill.
  6.  
  7. Allow children to tamper with the cylinder or grill.
  8.  
  9. Use, store, or transport propane cylinders near high temperatures (this includes storing spare cylinders near the grill).
  10.  
  11. Transport propane cylinders in your trunk. Instead, keep in a cool place, such as an air-conditioned car. And do not smoke in your car while transporting.
  12.  
  13. Move a lit grill.
  14.  
  15. Leave a lit grill unattended.
  16.  
  17. Attempt to adjust propane gas container(s) or hoses while the grill is lit.
  18.  
  19. Grill in a covered patio or garage, even with the doors open, because gases can build up.

Can you think of any more here?  You can never be to safe when using a gas grill!

These are a few common sense things you can think about to help you, your family and friends enjoy a safe and happy grilling season.  Enjoy happy grilling!

Thanks for coming by....


Thursday, March 24, 2011

Tips for Smoking Meat on Your Barbecue Grill

Smoked Salmon
Ah, spring and summer are my favorite times of year. Birds are singing, wildlife are out and about and back yard barbecue grill out smells are in the air. Makes you wonder if life can get any better.  One of my favorite things to do is fire my grill up and make smoked meat.

If smoking meat isn't one of your favorite things to do, I bet after this article it will be.  At least you should try it if you haven't ever done it.  Most people of course have tasted or eaten smoked meats, but have you made your own? In this article I will give you some tips to smoke your favorite meat on your barbecue grill.

You can also purchase many different types of smokers that are just for that purpose as well. However in this article we will just be using your basic back yard charcoal barbecue grill.


My mouth is already watering just writing this article for you. Getting hungry for it. There are as many different types of meat as there are ways to grill and smoke them. Most meats fall into about 5 categories that are:

  • Poultry
  • Pork
  • Beef
  • And Fish

All of these can be made very delicious by smoking them.  One of the things to remember when smoking is to make sure you get the proper heat.  You want to make sure the meat is not only smoked to flavor but that its well cooked for consumption.  This is as simple as using a meat thermometer purchased at your local department store or grocery.

Make Sure Your Temperature is Right

A temperature of  145°F to 180°F is sufficient to make sure your meat is well cooked. And depending on the type of meat, smoking times can be longer then others.  Smoking times also have to do with the strength of the smoke flavor that your after.

Types of Wood
Hickory Smoked Country Pork Ribs

Let's have a look at the many types of wood that can be used to flavor your meat with. You can use just about any type wood to smoke with. But try to remember not to use building material wood. These wood's are usually treated with chemicals that are hazardous to the human body. Not to mention they will ruin your meat.

Where I live at there is an abundance of Maple tree wood and Oak tree wood, as well as Cherry wood. Smoking your meats on your grill is as simple as finding a dry limb of wood and placing it next to the charcoals, not on them.  You want the wood just to simmer and make a strong smoke.

Then cover your grill with a lid and leave just enough room for air to get in to keep the coals burning.  A slight breeze is really good for this.  The idea is to keep the abundance of smoke in the grill as long as possible. The types of wood that make great smoked flavors are:


  • Maple
  • Oak
  • Cherry
  • Apple
  • Hickory
  • Pecan
  • Persimmon
  • Grape
  • Peach
  • Red Oak
  • Ash
  • Cedar

To name a few. Some of them hardwood and some softwoods.  Other fuels besides wood can also be employed, sometimes with the addition of flavoring ingredients. Chinese tea-smoking for example, uses a mixture of uncooked rice, sugar, and tea, heated at the base of a wok. Some North American ham and bacon makers smoke their products over burning corncobs.

Also there are many different types of charcoal you can use that already have the wood mixed in with it.  Here again it depends on the strength of the flavor of smoke that your trying top accomplish.

Try It You'll Like It

If you've never done any smoking on your own, I'll give you an example of how to do it so you can try it and see if you enjoy it.  Presuming you have a basic barbecue grill that is fairly large, and you're going to let's say, grill and smoke a whole 2lb chicken for example.  Here are the steps to make sure you maximize your flavor:

  • Make sure your grill is clean before starting
  • Place a pile of charcoal just a little larger in diameter than your chicken to either side of the grill
  • Use lighter fluid to start the charcoal and let burn until there's no more flame
  • With the charcoal up to temperature now, place your favorite wood next to the charcoal
  • Do not put the wood directly on the coals
  • Wait until you see the wood begin to simmer 
  • When the wood is simmering place your chicken to the other side from where the coals are
  • On the grate, but close to the heat
  • Cover the grill, leaving enough room for air to get inside somewhat to keep the temp up
  • Periodically check the chicken and wood to make sure the wood isn't burning to fast
  • If it is move it away from the coals just a bit or add more wood
  • The idea is to keep as much smoke in as possible and keep the temp up as mentioned above
  • Rotate your chicken periodically also

Final Thoughts 

Until you get experience with doing it, use a meat thermometer to make sure your temperature is up in ranges mentioned earlier in the article. After about 2 hours your ready to enjoy the best chicken you've ever had!  As time goes on and you become more familiar with what works for you don't forget to experiment with other types of wood.

Pretty soon you'll find a particular type wood that pleases you most for smoking. There are many places on the internet where you can purchase different types of smoking wood.  My personal favorite is Pecan wood. I can't get enough of smoked meat with it.

I hope this article has been of benefit to you. Happy smoking.

Thanks for coming by...


Saturday, March 19, 2011

Hunting - Deer Hunting and Various Types

Bear Hunting Trophy Head
Hunting today is much different than it was years ago. Years ago it was mostly done by bow and arrow by Native Americans. But today with the sophisticated firearms and multiples of tools and hunting supplies, the hunt has become much easier.

This article will give you some valuable information on a little history and various types of the sport.


Some History: Sport hunting means the tracking and pursuing of wildlife game for sport, food, and trade.

Today the term means lawful hunting. Not the form called poaching, which is the killing, trapping or capturing of wildlife for nothing, that is contrary to the law. Of course each state in North America has its own laws regulating such activity.

Hunting has predated the United States for thousands of years. It was also an important part of many pre-Columbian Native American cultures. In fact the Native Americans still today retain some of their hunting rights and are excluded from some laws and regulations.

Still a part of Indian treaties and under Federal Laws are the eagle feather laws and exemptions from Marine Mammal Protection Act. This is particularly important in the Alaskan Native communities and territories. The regulation of hunting is regulated by state laws as stated above.

One great hunting tool: Hunting supplies comes in many different tools and clothing as well as apparatus to use with your firearm all the way to even hunting oils used to deaden the human scent on the hunter. There are hunting outfitters galore on the internet for you to choose from to purchase these supplies.

But of all the various aids and hunting supplies available to the hunter, none are as useful as the dog. The domesticated dog has led to a relationship in which the hunting dog has found an important part in a hunter's life.

The Hunting dogs of today are used to find, chase and retrieve game and sometimes to kill it. Hunting dogs allow the hunter to track and kill prey that would other wise be very difficult with out the dog. Obviously, the hunting dog is an invaluable tool for the hunter.


A bit about hunting pests: Hunting can also be used in the control or elimination of various kinds of pests that plague mankind. This type of hunting can help to reduce or control diseases caused by overpopulation of certain pests. Such as rats, beavers, wolves, or the other many pesky predators. Some in populated areas and some rural areas as well.

In the United States there are Wildlife Managers who are part of hunting regulatory and licensing bodies. They help to set the rules on the number, hunting season times, and the conditions to which game may be hunted.

Various types: Hunting big game usually requires a "tag" for each animal taken. These must be purchased in addition to your hunting license. And the number of tags is usually limited to each hunter. Sometimes depending on the amount of hunters, where there is more than what the governing quota is believed of the game in question, tags are usually given on a lottery basis.

The United States has many Hunting Ranches that are run by ranchers and different gaming clubs and associations. These can be found as well on the internet for your pleasure. Here are a couple of places I have supplied if you care to check them out. I have no affiliation with these.


Game animals are typically divided into several categories for regulatory purposes. Some categories, along with some species are as follows:

  • Big Game:  Whitetail hunting, moose, caribou, bighorn sheep, elk hunting, mule deer, pronghorn, boar, and javelina hunting.
  • Small Game:  Rabbit hunting, squirrel, opossum, raccoon, porcupine, skunk, and armadillo hunting.
  • Fur-bearing:  Beaver hunting, red fox, mink, pine martin, musk rat, otter, and bobcat.
  • Predators:  Mountain lion, bear hunting and coyote.
  • Upland Game Bird:  Turkey, chukar, dove, grouse, pheasant and quail hunting.
  • Waterfowl:  Swan, teal, merganser, geese and duck hunting.

Hunting Humor: President Teddy Roosevelt popularized the role of the hunter conservationist. It has been primary to the development of the modern Fair Chase tradition. When hunting games became popular on the internet, allowing people to use remotely controlled guns.

That type of hunting became wildly criticized by real life hunters. They claimed it was violating the principles of the Fair Chase tradition. A representative of the NRA said " the NRA (National Rifle Association) has always maintained that fair chase, being in the field with your firearm or bow, is an important element of the hunting tradition. Sitting at your desk in front of your computer, clicking a mouse, has nothing to do with hunting."

Thanks for coming by...


Thursday, March 17, 2011

Prelude To The Gun Safe Review


See that counter up there?  Thats live stuff!  Realtime.

Thanks for coming to read my prelude to the Gun Safe review.   Unfortunately those statistics for accidental deaths do not have to be.  If people that have Firearms would just purchase a good quality Gun Safe those statistics would go down to zero I believe.


If you purchase a Firearm no matter whether its a Long Gun or Handgun why not also buy a Gun Safe?  Just think of your children or children period.  Kids just seem to have the knack of finding things that the adults hide in their homes. And if they find your loaded Gun you've just placed them in harms way!

Its plain, get a Gun Safe.  Now read my review of a great quality Gun Safe for the money.  Click this link or click the tab at the top to read it.  Thanks for choosing to protect you and your family.


Thanks for coming by...


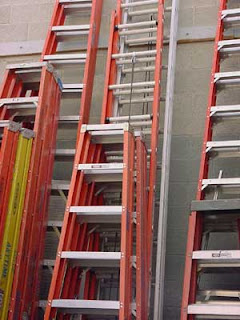
What Are The Different Variations of Ladders In Use Today

variations of ladders
Today there are many different variations of ladders in use. We know that ladders come in all shapes and sizes and each one has its purpose. Everything from the painting stepladder to fire truck ladders and all in between.


I want to bring to light some of those that are available to society in this article.  Who knows, maybe theres some you haven't even heard of before.  So let's take a look at whats out there and see the many uses for people today.

Some of the different ladder variations that are uncommon to most are:

  • The Bridge Ladder
  • The Cat Ladder
  • The Fixed Ladder
  • The Orchard Ladder
  • The Turntable Ladder
  • The Hook Ladder 
  • The Rope Ladder
  • The Pool Ladder
  • The Assault Ladder
We have a lot of different ones and some you may already know about and some you don't.  Theres a couple that I have never heard of before.  Such as the Assault Ladder.  So let's just take it from the top down and have a look at what these are and their uses.

The Bridge Ladder:  A horizontally laid ladder that acts a connector between 2 points separated by gulf below. This is the one you may see in the movies such as in a jungle where there a vertical chasm.  It has lots of flexibility in it and when you walk across it it flexes up and down.  It always amazes me how they build these.

The Cat Ladder:  Or chicken ladder, used on very steep roofs so the workers won't slide off when working. I've done some roofing in my time and we always used a variation of this one by simply nailing down a 2x4 on the roof.  And we'd just move it as we went down working from the top to the bottom.

The Fixed Ladder:  This one is a vertical ladder that is stationary.  Usually you see them on the side of industrial buildings.  Usually made of steel and used to get up on the roofs of very high structures.  These ladders sometimes come with steel cages around them for added safety to the worker.  Since they are industrial ladders they are covered by OSHA and ANSI standards.


The Orchard Ladder:  This one is probably self explanatory.  It is a three legged step ladder with the third leg made so that it can be inserted between tree branches for fruit picking.  The sound of it seems a little unsafe to me.  But maybe some of you have had experience with them and can tell me how safe they are.

The Turntable Ladder:  This is the apparatus you see on a fire truck.  The name of it comes from the fact that its mounted on a rotating platter.  It is also a hydraulic or pneumatic extension ladder.  Used to allow the firefighter to reach great heights and project large amounts of water directly down into the fire.

The Hook Ladder:  Also called a pompier ladder, used to be a very important tool of the fire department.  This tool allowed the firefighters to reach into every window in a burning building.  They would use it if there were no way to get up the inside stairwells.  The firefighter would lean out a window with the pompier ladder and swing the hook through the window above them, latching the hook to the window stool.  Allowing access to each floor of the building.

The Rope Ladder:  This one is where the object to be climbed is too curved to use a rigid ladder. They may have rigid or flexible rungs.  Climbing a rope ladder requires more skill than climbing a rigid ladder, because the ladder tends to swing like a pendulum.  You also sometimes see these in children's playgrounds.

The Pool Ladder:  Pretty self explanatory here to.  Although you not only see them attached to swimming pools, but also they are used most boats.  They also come with large handrails to facilitate gripping of the ladder.

The Assault Ladder:  In my research I was amazed to find this one.  I had never heard of it till now.  How about you?  This ladder seems to be used primarily by the military.  It was created for covert operations such as sniper placement, and vessel boardings.  It was developed and designed for tubular assaults including buses and trains and for first story breaching.  Its extra wide design gives the user greater stability, but can be folded away to be stored.  Interesting!

There you have it. Some interesting ladders in use today by our society.  Some known, some not so known. I hope you enjoyed reading this as much as I enjoyed researching and writing it.

Thanks for coming by.....


Monday, March 14, 2011

10 Tips for Proper Firearm Cleaning


cleaning revolver firearm
As a Gun advocate my self, it is very important to maintain your firearm in clean condition.  Here are 3 reasons why.

The three major reasons for cleaning and lubricating a firearm are:

  •  Prevent malfunctions due to a build-up of dirt and fouling or lack of lubrication
  •  Prevent damage to the gun from corrosion or lack of lubrication
  •  Preserve the value of the firearm and prevent premature failure of parts


cleaning semi-auto firearmAs you can see a dirty firearm is a dangerous one.  If the firearm jams from being to dirty or jams period which most Semi-Auto firearms do at one time or another, then you have a very dangerous situation on your hands.  If a bullet misfires you have a dangerous thing on your hands also.

This article will give you 10 tips for proper firearm cleaning.  So you can make sure your shooting experience is a fun and safe time.  Here are the 10 Tips:

  1. Review Owner’s Manual 
  2. Ensure gun is unloaded Check again  Refer to my article 4 Tips for Proper Gun Safety here
  3. Protect hand stocks (grips)
  4. Apply cleaner to dissolve lead, copper & carbon
  5. Scrub clean
  6. Remove contaminants with solvent
  7. Re-apply lubricant (oil or grease) to reduce friction
  8. Restore protection against corrosion (oil)
  9. Dry fire to ensure proper reassembly
  10. Wash Hands
     
Always refer to your Owner's Manual that came with your firearm.  It will teach you how to disassemble the firearm the proper way and how to reassemble it.  If you are in need of a Manual for your specific firearm you can get one from the link below in PDF format.
Before attempting cleaning always be sure the firearm is unloaded.  Check it twice!  Refer to my article 4 Tips for Proper Gun Safety.

Remove or protect wooden, ivory or custom hand stocks (grips). Remove using the proper size screw driver that fills the screw slot, or wrap stocks with a rag or painter’s tape (easy release) to avoid soaking the wood, ivory etc. with solvent or oil.

For semi-automatics, field strip or separate the slide and barrel group from the frame, using the recommended method in your owner’s manual.  For revolvers, remove the cylinder from the frame.  Consider wearing rubber gloves. Attach either a bore mop or patch-holder and patch to your cleaning rod.


Liberally apply CLP2 or bore cleaner to the mop/patch, swab the bore (inside barrel) and let soak for about thirty minutes to dissolve copper, lead and carbon residue. (High deposits of any of these due to poor cleaning habits may require a special-purpose cleaner.)

While the bore soaks, spray the gun with CLP or your preferred cleaning product. (To avoid unwanted chemical reactions, consider purchasing cleaning solvents and lubricants of the same brand.)

Using either a toothbrush or nylon pistol cleaning brush, scrub moving contact surfaces (rails & slide), extractor claw, recoil spring (semi-autos), breech block (where cartridge case backs into when fired) and the areas named in your owner’s manual. Protect/remove hand stocks as appropriate.

While bore continues to soak, spray the semi-auto action or revolver breech area & cylinder with Powder Blast/Gun Scrubber or similar pressurized solvent to remove oil, grime and carbon residue.

While the bore soaks, remove excess solvent from the action and external surfaces with cleaning patch, rag, and Q-tips and reapply CLP or oil to guard against rust.

Per your user manual instructions, once the bore has soaked thoroughly, attach a bronze or nylon bore brush to the cleaning rod and run the brush back and forth through the bore (inside barrel) 10-20 times – or according to owner’s manual.

Lubricate the Firearm according to the Owner’s Manual.
  • For semi-automatics: Put three or four drops of oil on the barrel hood that is exposed in the ejection port. Then lock the slide open. Put a ring of oil on the barrel 1/4 inch back of the muzzle. Place two or three drops of oil in each slide rail groove and one or two drops on the center rail that cocks the hammer. Now close the slide and hand cycle the pistol six times with the muzzle pointed in a safe direction. This will spread the oil.
  • For revolvers: The cylinder turns on a shaft, called the crane or yoke. You can put one or two drops of oil at the point that the cylinder and yoke join. Tip the revolver muzzle up as you apply the oil and rotate the cylinder after each drop. If you continue to hold the muzzle up and turn the cylinder for a few
    moments after you apply the oil, it will run to the rear of the moving surfaces. With the cylinder closed, cock the hammer. Put two drops of oil along each side of the hammer. Now cycle the action several times. Turn the pistol upside down. Put two drops of oil on each side of the trigger. Now cycle
    the revolver several times while it is upside down to spread the oil.
You should dry fire your firearm several time to ensure smooth workability.  Remember to clean your firearm after every 50-100 rounds have been fired through it.  Of course be sure to wash your hands thoroughly after your cleaning work.

If you don't have a safe place to store your firearms, I have a written a quality review of a Gun Safe that will more then meet your standards - Read it here.

If you need firearm cleaning supplies, here are 3 places that you can get those.

  • BROWNELLS
    Cleaning supplies, gunsmithing tools, parts, books, etc.
    641 / 623-4000
    www.brownells.com
Thanks for coming by........


Saturday, March 12, 2011

Ladder Safety: Top 9 Tips

tied off ladder
There are times when I've needed to get something done in a hurry where a ladder was needed to be used. And of course I found out the scary way that that's not the way to go about working up on a ladder. Consequently, this article post will be of benefit not only to you but to me also.


After some research on the subject here are my Top 9 tips for Ladder Safety.  May we take them to heart..

  1. Make sure the Ladder is locked into place before climbing 
  2. Be sure the ground is at least fairly level and solid
  3. Never climb to the top of the Ladder
  4. Make sure there are no obstacles to obstruct your climbing
  5. Get help to hold the Ladder if needed
  6. Pick the right Ladder - Refer to my article "How to Make the Right Ladder Choice" - Here
  7. If needed, tie off the Ladder
  8. Always use proper climbing techniques   
  9. Make sure the Ladder is not to steep or shallow 
With stepladders and extension ladders make sure the locking arms are locked fully into place.  This will help to insure that the Ladder doesn't fold up on you when your climbing.  The locking arms on a stepladder are on both sides and ensure that each leg is locked into place.

On an extension ladder it has two spring loaded locks on either side to make sure it doesn't slide down while your up on it.  For maximum safety make sure these are locked in place before you begin to climb.


The ground should be fairly level before beginning.  If it isn't, you must for safety sake find a place to get it level as possible.  The ground should be dry and hard.  Not soft so it can sink to either side.

Never climb to the top of the Ladder as your weight will surely make the ladder top heavy.  Always climb only to the 3rd step down from the top.  Any higher and it will become unstable.

When climbing up make sure there is nothing to obstruct your climb such as tree limbs, electrical wires, etc..

If you can't meet any of the first 4 tips just mentioned then get help.  Ask a friend or family member for help to hold the ladder for you.  In fact, 2 people are better than one to make sure of maximum safety.

There are different types of ladders for different types of jobs or projects.  Such as Aluminum, Wood, and Fiberglass ladders.  Which one is right for you for what your doing?  As stated, refer to my article "How to Make the Right Ladder Choice" - Here to help you in your decision.

If your climbing up on a wall or roof, for extra stability tie the ladder off on both sides.  For example, on a roof you can drive a nail into the shingles on each side and use rope to tie off the ladder so it won't slide either way on you while up working on it.  Creating greater stability and safety.

Never climb up the ladder backwards.  Don't climb up on the front of a stepladder.  Always face the ladder and climb with both feet one step at a time.  As stated before never climb beyond the 3rd step from the top.  And never step out on the shelf of a paint ladder.

When you put up the ladder make sure it is not to steep or shallow as that will cause it to slide when your on it. Remember you can tie it off for greater safety.

Most of these are just common sense steps folks.  For greater benefit, print yourself off a hard copy of this article and use it as a checklist each time you go to get up on a ladder.  Since your safety is always number 1.

For both inside and outside I have a quality review of a great all purpose ladder you can read here.


Thank for coming by......


Thursday, March 10, 2011

4 Tips for Proper Gun Safety

american firearms
It can never be overstated that Gun Safety is foremost in anyone's operation or handling of firearms. Accidental gun deaths are already since January the 1st 2011, at 119 so far for this year.  Unfortunately that number will only increase as the year goes on.

If people that have firearms will only take the proper ways to gun safety then maybe that number will go down and stay down.  What I want to share with you today are 4 tips to help you make sure that you or your children don't get harmed in any way by a firearm.  Especially by one you could swear was unloaded after you last used it.

There are many more proper procedures for Gun Safety than just the 4 I'll give you in this post.  But, the 4 I give are the primary ones that will make sure you or your family members don't become another statistic.

Tip number 1.)
  • Assume every firearm is loaded.
Probably the most important one of all is this one.  When I was a kid, like most kids I had a toy cap gun.  I would always when I picked that gun up would pull the trigger just to hear the click of the hammer.  I remember one day that I picked it up to play with it and forgot that the last time I played with it that I hadn't shot all the caps out of it.

I pulled the cap gun up close to look at it and as always instinctively I pulled the trigger.  And kaboom, the thing went off and the gun was maybe 5 inches from my face when it did.  I bet you never seen a little kid of about 50lbs or so jump so high!!  Not to mention my young little ears were ringing after that happened.

Always remember to check the Gun to see if it is loaded.  A revolver handgun is much easier to tell if it is loaded because you can see the ammo in the cylinder.  On the other hand, if its a semi-auto handgun you need to remove the magazine and pull back the slide to make sure there is no ammo in the chamber of the firearm.

Tip number 2.)
  • Control the muzzle direction at all times.
Never, let me say that again, NEVER point a gun at anyone!!  Whether you know or don't know it's unloaded. Its just plain good safety that's all.  Even when you're in between shots always point the Gun to the ground.  If you lay it on a table point it away from where people are standing.


Have you ever stopped to take notice that all Gun holsters are pointing at the ground?  Not in any other direction but down at the ground.  And when showing your friends or family your Guns, never hand it to them by the barrel first.

Always hand the firearm with the barrel pointed toward you.  So that they take it from your hands by the hand grip.  If you know its loaded when you hand it to them, hand it to them sideways with the barrel pointed to the ground.  And make sure they know its loaded before you hand it to them.

Tip number 3.)
  • Keep your trigger finger off trigger and out of trigger guard.   
This is pretty straight forward stuff here.  Always keep your finger out of the trigger guard even when your out hunting as well as target shooting.  Only when your ready to fire should your finger be in the trigger guard. Some Guns are made with whats known as a hair trigger.

That means it takes just a small amount of pressure to fire the Gun.  In fact those are more dangerous firearms and usually have been custom made like that.

Tip number 4.)
  • See that the firearm is unloaded. PROVE it safe.
In other words, at this point, if your still unsure about the firearm refer back to Tip number 1.  Nothing wrong with checking to make sure its unloaded again.  A firearm is a machine.  Nothing more.  Humans usually get hurt by the machines they make.  Because they forget to take the proper steps to ensure Safety.    

It is my hope that this article will be of value to you the reader.  My hope that you will not only enjoy your firearm but that you will do so in utmost Safety.  Another thing, all guns have built in safety mechanisms.  Use them!  But, that is no excuse for not checking the Gun itself. 

These same Tips apply to all firearms, rifles, shotguns, etc..


I have written a quality review of a very good Gun safe for you and your family.  Click here to read it.

Thanks for coming by.....


Monday, March 7, 2011

How to Make the Right Ladder Choice

ladder choice?
There are many types of ladders to choose from today.  The question is how do you make the right ladder choice out of all the different types for the job your doing?  Well, that does depend on the project your doing. Is it inside or outside the house?


Most commonly if you are working inside your home you want an 8 to 10 foot ladder to do the work safely.  For example if you have 10 foot vaulted ceilings and you're painting the ceilings a 12 foot stepladder may do the job.  For the standard 8 foot level ceilings you're fine with a 8 foot stepladder.

Lets take a look at the types of ladders that are available for the inside of your home.
  • Painting Stepladder
  • Front Stepladder
  • Twin Stepladder
The Painting Stepladder usually comes in 8 to 12 foot heights and has a fold out shelf to place your paint cans and brushes on.  Or any other tools your using for the project.  The painting stepladder also falls under the category of Front Stepladder.

The Front Stepladder is called so because of its only having steps on one side.  And the other side has only bracing rungs.  Of course designed for one person at a time.

The Twin Stepladder on the other hand is called so because of its ability to allow 2 people to safely stand on it at the same time.  Why would a Twin Stepladder be needed?  It is very helpful to have one in the event that you are for example, repairing a ceiling fan or rather installing one for that matter.

It will allow one person to hold the fan while the other one performs the wiring attachment.  Or one person could be painting 1 side of the ceiling while another paints the other side.  But primarily I would say it is for safety.

If one person needed to go up very high to work on a ceiling, then the other person could stand on the bottom step of the other side.  Creating balance for safety.


Now lets take a look at some types of ladders for outside the home.
  • Stepladder
  • Extension Ladder
  • Multiple Configuration Ladder 

Of course the stepladder mentioned above in either front or twin sided can be used effectively outside the home as well.  Again depending on the project.

The Extension Ladder and I'm not talking about the one you see the fire department have on their big trucks. That's the one you don't want to see used at your home!...:)  No seriously, the extension ladder is a very useful tool for getting up to those high places such as your roof or maybe a tree to do some trimming, etc.

Extension ladders can come in heights of up to 40 feet.  Most extension ladders extend out in 1 foot increments at a time with latching braces or hooks.  If you have a 2 story house usually a 22 foot extension ladder will suffice.  1 story you can usually get by with a 14 to 16 foot to reach your roof.

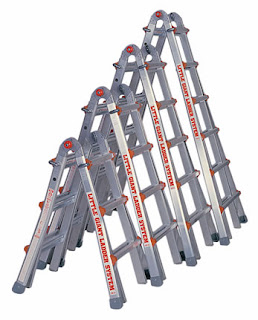
The Multiple Configuration ladder can not only be used for all the above but can be also be used in a scaffolding configuration.  In the scaffolding position you just need to use a plank of strong wood to make the base for standing.  And adjusting to different heights also.

As you can see there are many types of ladders to the job your trying to accomplish. And of course there are the different makes of ladders as well.
  • Wood
  • Aluminum
  • Fiberglass 

All of these makes will get the job done, but there are safety concerns with each.  These will be covered in another article.

When picking out a stepladder you need to keep the height in mind. Stepladders have a huge range of height at your disposal.  The same applies for all the above mentioned ladders other than stepladders.  The smallest of the stepladders start out at three feet and can be compared to that of the step stool.

The average stepladder used is between five to nine feet, though stepladders are made as high as twenty feet. The rungs of the stepladders are set apart at ten to fourteen inch increments but most manufactures prefer to set them at one foot increments. The widths of the rungs are set at twelve to fourteen inches.

You can read my review of a great middle of the road stepladder for use both inside and outside of the home. Click here to read the review.

Thank for coming by....


Thursday, March 3, 2011

Welcome to My Product Review Site

Hello and welcome to my product review site.  This site is brand new and we're trying to get it right so it looks nice and neat. It'll take me some time to get it filled with great product reviews for you.  I'll be filling it with many reviews of products you use every day in your home and at the job site.

I'll also be including many "How To" articles and the like to help you not only use the products, but also be safe while your using them.  So come back often and see what I have to offer here that may be of help to you.


Writing product reviews has become a passion of mine right along with my other site The Republic of Shrewd Exposure.  Although they are two completely different works altogether, the love for blogging is something I find very enjoying.

There are a couple product reviews already on the site about the Werner MT 22 300 Pound Duty Rating Telescoping Multi-Ladder, 22 foot. and the Sentry Safe GO135 Review.  Have a read and see if its something that will benefit you.  Just click the tabs above or the links in this post to read it.

Thanks for stopping by...